The Ultrasonic Cleaner FAQ
The Technical Stuff
- What is ultrasonic cavitation?
- What is degassing? When and why should it be done?
- How do I know if my cleaner is working right?
- How do I perform the "glass slide" test?
- How do I perform the "foil" test?
Ultrasonic Cleaning Solution
- Why is a special ultrasonic cleaner solution required for cleaning?
- What cleaning solution should I use?
- What cleaning solution shouldn't I use?
- When should I change my cleaning solution?
Ultrasonic Cleaning Techniques
- Why should I use an ultrasonic cleaner?
- How to choose your ultrasonic cleaner
- How do I get the best ultrasonic cleaning?
- What's the difference between direct and indirect cleaning?
- What is the length of cleaning time?
- Can ultrasonic cleaning damage my parts?
- Why must I keep solution at the tank's level indicator?
- What is the purpose of the unit heater?
- Why must trays or beakers be used?
- What is the optimum cleaning temperature?
- How do I drain my cleaner?
Ultrasonic Cleaning Applications
Ultrasonic Jewelry Cleaner FAQ
What is ultrasonic cavitation?
Cavitation is the rapid creation, and destruction, of tiny little vacuum bubbles or "cavities" in a liquid. "How on earth does that clean anything?" you may ask. Well the process is rather interesting. These little microscopic bubbles, when forced into contact with a solid surface, collapse. When they collapse, the surrounding liquid fires into the area the bubble once occupied, which creates an intense "scrubbing" action as the cleaning solution rushes against the object being cleaned. Just imagine it as millions of microscopic pressure washers blasting the object from all angles at once! BACK TO TOP
What is degassing? When and why should it be done?
Degassing is the initial removal of gases from your cleaning solution. You can't get any cleaning done until you degas, because all the energy is being used to drive the gases out of the water. You should degas every time you put fresh cleaning solution into your tank. Normally just running the ultrasonics for 5 minutes will do the trick. BACK TO TOP
How do I know if my cleaner is working right?
Most poor cleaning usually results from improper control of one or more process variable(s); such as choosing the wrong detergent solution, insufficient heat, or not allowing enough time for the particular soil to be removed. If you suspect that your ultrasonic cleaner is not cavitating properly, there are two simple tests you can perform: the "glass slide" test and the "foil" test. BACK TO TOP
How do I perform the "glass slide" test?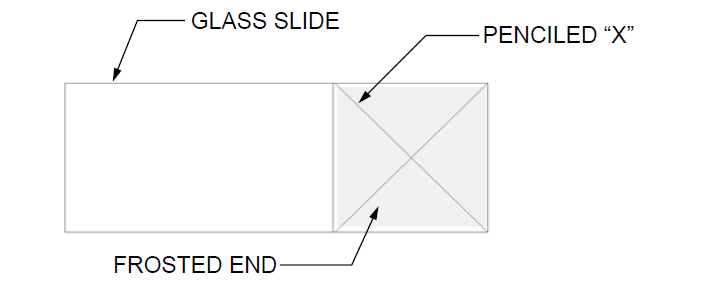
Check your ultrasonic bath periodically to test the level of activity of the ultrasonic cavitation. Frequency of testing will depend on your use of the unit, however, Branson suggests running this test monthly.
You will need the following equipment:
• Frosted microscope glass slide (1” x 3”), such as Fisherbrand ®1 #12-550-343 frosted microscope slides, or equivalent;
• No. 2 lead pencil; and
• General purpose household cleaning solution, such as Dawn ®2 liquid soap.
Test procedure:
1. Prepare a fresh solution with general purpose household cleaning solution (concentration 1%) and warm tap water 49 °C – 60 °C (120 °F – 140 °F).
2. Fill the tank to within 3/8 inch (1 cm) of the “operating level” line.
3. Turn the ultrasonics on for at least five to ten minutes to allow for degassing.
4. Prepare the glass slide by first wetting the frosted portion with tap water.
5. With the No. 2 pencil, on the frosted portion make an “X” from corner to corner.
6. Immerse the frosted end of the slide into the solution. Hold the slide vertically and center it in the solution.
7. Make sure that model CPX/CPHX models are in Timed or Constant Sonics Mode, not Degas Mode, then turn ultrasonics On.
The ultrasonics will begin immediately to remove the lead from the slide. All lead should be removed within 10 seconds. If your unit passes this test, its ultrasonic cavitation is acceptable.
NOTE:
To ensure consistency from test to test, be sure to repeat test conditions—use the same solution concentration, liquid level,temperature, type of pencil, length of degassing, etc. BACK TO TOP
How do I perform the "foil" test?
Cut three small pieces of aluminum foil about 4" x 8" each. Fold each piece over a rod that you will use to suspend the foil in the tank. A clothes hanger works well. Your cleaner should be filled with an ultrasonic cleaning solution, degassed, and brought up to normal operating temperature. Suspend the first "square" in the center of the tank and the other two a couple of inches from each end of the tank. Make sure that the tank is filled to the fill line, and turn on the ultrasonics for about ten minutes. Remove the foil and inspect: All three pieces of aluminum foil should be perforated and wrinkled to about the same degree. BACK TO TOP
Why is a special ultrasonic cleaner solution required for cleaning?
Soils adhere to the parts... if they didn't, the soil would just fall off the parts! The purpose of the solution is to break the bonds between parts and their soils. Water alone has no cleaning properties. The primary purpose of the ultrasonic activity (cavitation) is to assist the solution in doing its job. An ultrasonic cleaning solution contains various ingredients designed to optimize the ultrasonic cleaning process. For example, increased cavitation levels result from reduced fluid surface tension. An ultrasonic solution will contain a good wetting agent or surfactant. BACK TO TOP
What cleaning solution should I use?
First of all, remember that you have to match the cleaning solution to both the soil being removed (this is known as the solution having an "affinity" for the soil), and to the part being cleaned. A mismatch will result in poor cleaning and possible part damage. Modern ultrasonic cleaning solutions are compounded from a variety of detergents, wetting agents and other reactive components. A large variety of excellent formulations are available, designed for specific applications. Proper selection is crucial for acceptable cleaning activity and to preclude undesirable reactivity with the part being cleaned. Cleanosonic can help you to identify either the optimal 'stock' cleaning formula, or likely candidates to test and evaluate. BACK TO TOP
What cleaning solution shouldn't I use?
Flammables or solutions with low flash points should never be used. NO IPA (isopropol alcohol). Period. The energy released by cavitation is converted to heat and kinetic energy, generating high temperature gradients in the solution, and can create hazardous conditions with flammable liquids. Acids, bleach and bleach by-products should generally be avoided, but may be used with indirect cleaning in a proper indirect cleaning container, such as a glass beaker, and appropriate care. Acid and bleach will damage stainless steel tanks, and/or create hazardous conditions. BACK TO TOP
When should I change my cleaning solution?
You'll notice that either it is taking longer to clean your parts, or your parts are not getting as clean as they were. If you like, you can change it out when it starts to look or smell funky - but you may be giving up some useful solution life. BACK TO TOP
Why should I use an ultrasonic cleaner?
Why Ultrasonics? Primarily to clean more parts faster for less money! But let's take a closer look...
The best known advantages of ultrasonic cleaning:
- Precision - the ability to get into the tiniest places and get the dirt out. Some applications are only achievable via ultrasonics.
- Speed - Ultrasonics is faster than almost any other method for many jobs. This means less time in process, and more parts out the door.
- Labor savings - Often and entire assembly of sub-assembly can be cleaned without taking it apart.
- Consistent results - Get that machine set up properly, and ler it rip. Batch after batch of identically cleaned parts. One less variable for manufacturing and QC to worry about.
- Automation - You can set ultrasonic tanks directly into your production line, and make cleaning just another process step, instead of a time consuming off line process.
- The environment - using aqueous solutions means no solvents, no greenhouse gases, and recyclable cleaning solutions.
- Safety - Get rid of harmful solvent vapors and the smell!
How to choose your ultrasonic cleaner
 Many first time buyers of ultrasonic cleaners are unsure what equipment will work best for them. Selecting the right equipment is really just a matter of applying the correct criteria. Take a few minutes to read the info below, the Ultrasonic FAQ, and Optimizing your cleaner and you'll have all the information you need to make an informed decision.....
How big a tank do I need?
It might seem that all you need to do is measure your largest part and size your tank accordingly. Actually, a better route is to take a look at all your parts: If you are cleaning the same thing in every batch, or only deal with small parts, the choice is easy. But if you have a wide variety of part sizes and geometries, take a look at the mix. Are there just one or two large parts, and many smaller ones? It may not make sense to buy a larger system just for a few parts. Tank pricing rises rapidly with size.
Do I really need heat?
Unless you will always fill your tank with hot water, and refill it with hot water and cleaning chemistry every time it cools off, yes, you need heat. Ultrasonic energy moves best through water at a temperature betwwen 140 and 170 F. In addition, hot water helps dissolve many soils, further enhancing parts cleaning.
Do I really need a parts basket?
Maybe not. Remember that you don't want the parts resting on the bottom of the tank. This inhibits the transmission of energy through the water, as the transducers are mounted on the bottom. Some people with larger parts just make a simple stand or spacer to keep their parts off the bottom and it works fine.
What should I put in this thing anyway?
That depends on the part and the soil to be removed. Most common applications will be served by one of the cleaning solution offered here on our sight. Take a look at the ultrasonic solutions page. If you don't find what you need there, feel free to give us a call. We have a over a decade of experience in ultrasonic cleaning. If we can't help you, we will be happy to put you in touch with someone who can.
I found some cheaper stuff elsewhere, why should I buy ultrasonic cleaners from you?
The best reason is that you really do get what you pay for, and this applies on the internet, just as it does elsewhere. Here is what we are offering for your dollar:
- New equipment from the largest, and the leading, manufacturers of ultrasonic equipment worldwide.
- All of our equipment carries two guarantees: the standard manufacturers warranty, and our 30 day DOA return policy guaranteeing satisfaction.
- There is always a cheaper source if you are willing to look hard enough. We do strive to be one of the least expensive sources for ultrasonic equipment on the net, and we know we offer the best value.
- We're not just authorized distributors. We are been Manufacturers Representatives for Branson Ultrasonics for a decade. We are happy to share our experience in cleaning with you, our customer. Just send an email or call us toll free and we will do all we can to help BACK TO TOP
How do I get the best ultrasonic cleaning?
To understand how an ultrasonic cleaner can perform cleaning or sonification, it helps to understand the principles of ultrasound and how they are applied in ultrasonic cleaning. Ultrasound is sound transmitted at frequencies beyond the range of human hearing. Ultrasonic energy generated by piezoelectric transducer at a rate of 40,000 times per second creates cavitation, the mechanism for ultrasonic cleaning.
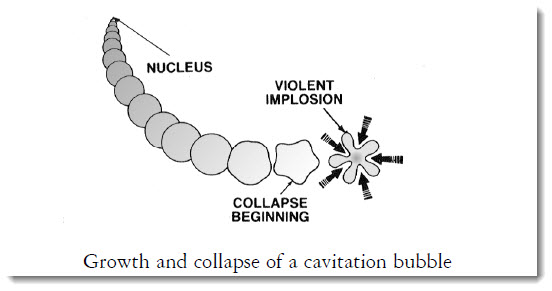 Cavitation consists of the formation and collapse of countless tiny cavities, or vacuum bubbles, in the liquid. The energy produces alternating high and low pressure waves within the liquid in the tank. The liquid is compressed during the high-pressure phase of the wave cycle, then pulled apart during the low-pressure phase.
As the pressure in the liquid is reduced during the low-pressure phase, cavities grow from microscopic nuclei to a maximum critical diameter. During the subsequent high-pressure phase they are compressed and implode. The energy is powerful but safe for parts because it is localized at microscopic scale.
Factors affecting the strength of cavitation are:
- temperature
- surface tension
- vapor pressure
- viscosity
- and density
Ultrasonic Cleaning Best Practices
• When selecting an ultrasonic cleaner, look for units that allow as much control as possible of these factors. For example, a microprocessor-based digital thermostatic control allows a constant display of the solution temperature for close monitoring and control. Heat also increases the chemical activity of cleaning solutions. Solution temperature generally should be kept between 120-140 deg. F. If the temperature and time can be controlled, then repeatable cleaning consistency can be achieved.
• Adding a wetting agent or surfactant to the bath can reduce surface tension of the liquid. Reduced surface tension will increase cavitation strength. Medium vapor pressure is most conducive to ultrasound activity. Low vapor pressure produces cavitation bubbles that implode with relatively greater force, but results in fewer bubbles and a higher cavitation threshold. High vapor pressure is not very effective - more bubbles are created, but they collapse with less intensity due to a smaller internal/external pressure differential. Low viscosity promotes cavitation. high density creates intense cavitation with a greater implosive force.
• Never place parts or receptacles directly on the bottom of the unit. It can cause the unit to fail because the parts will reflect the ultrasonic energy back into the transducer(s). Always allow at least one inch between the tank bottom and the beaker or receptacle for adequate cavitation.
• Never use solvents in a small benchtop cleaner. It is neither safe nor environmentally responsible. Solvents vaporize quickly. Vapors of flammable solutions can collect under the unit, where ignition is possible from electrical components.
• Keep solution within one inch of the top of the unit when the beaker or tray in place. In the liquid versus cavitational activity relationship, it does not follow that less solution will intensify the activity. Units operate at optimum efficiency when filled to within one inch of the top.
• Wait 5 to 10 minutes after activating the equipment for fresh solution to degas. This need not be repeated with subsequent use, as degassing is required only after the bath is freshly filled.
• If using a tray or basket to lower the parts into the solution, it is better to use a holder that is of open construction, either a mesh basket or an insert tray, that is adequately perforated for drainage. This also permits free access of the sound waves to the parts.
• Renew cleaning solutions often to increase ultrasonic cleaning activity. Solutions, as with most chemicals, become spent over time. Solutions can become contaminated with suspended soil particles, which can settle to the tank bottom inhibiting ultrasonic transmission. BACK TO TOP
What is the difference between direct and indirect cleaning? 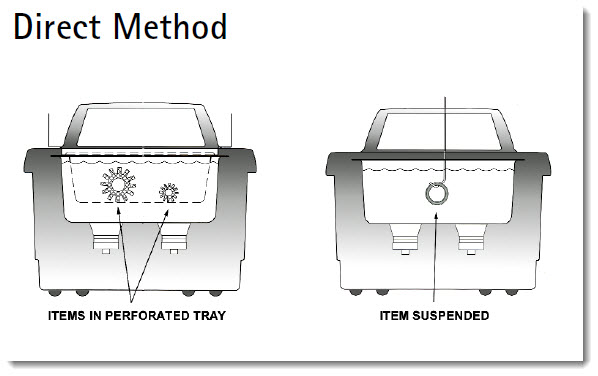
• Suspends parts using a perforated tray, mesh basket, or a support rack.
• Permits sound waves to penetrate directly to the parts.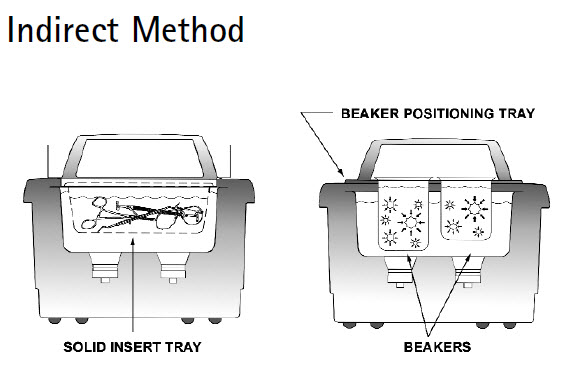
• Suspends parts using a solid tray, or beakers with a beaker cover.
• Ideal for cleaning small parts.
• Discarded soil cleans easily from a beaker or solid tray.
• Indirect method is ideal for sample preparation. BACK TO TOP
How long will it take to clean my parts?
This is kind of like asking "How far is up?". Cleaning time will depend on what you're cleaning, how many of what you're cleaning, and how dirty the thing your cleaning is. A gummed up carburetor will take longer to clean than say, a dusty piece of jewelry. Temperature and cleaning solution also play a part in cleaning time. In general, a tank of hot, fresh solution will clean better and faster than a tank of just cold water. BACK TO TOP
Will an ultrasonic cleaner damage my parts?
The thing to keep in mind with ultrasonics is that all they do is scrub indiscriminately. An ultrasonic bath doesn't know the difference between a flimsy coating on a lens or a layer of soil, and will scour both off. However ultrasonics have been proven safe for most parts, and the biggest thing to consider to ensure the safety of your parts is choosing the correct cleaning solution. BACK TO TOP
Do I have to fill my tank to the "Fill" line?
YES! Your ultrasonic cleaner's manufacturer designed the unit to work best when filled to that line. If under filled, the characteristics of the environment change, which could result in improper ultrasonic transmission, which in turn could result in poor cleaning performance or damage to the unit. Units with a heater are especially at risk of damage due to underfilling. If the heating element isn't covered by the water line, warping of the tank itself could occur. BACK TO TOP
The answer to this question depends on what you're trying to do. In general, if are cleaning heavy or petroleum based soils from parts, hot water and thus a heated tank is recommended. BACK TO TOP
Do you need them? Yes and No. The main function of insertable trays or baskets is to hold the part being cleaned off the bottom of the tank. For cavitation to occur, your ultrasonic cleaner needs about an inch between the transducer and the object being cleaned. Baskets also assist in removing parts for the unit, and in some cases drainage. BACK TO TOP
What's the best cleaning temperature?
Generally ultrasonics work best between 130 and 170 degrees fahrenheit. It's important however to make sure these temperatures are safe for your parts before cleaning. BACK TO TOP
How do I drain my ultrasonic cleaner?
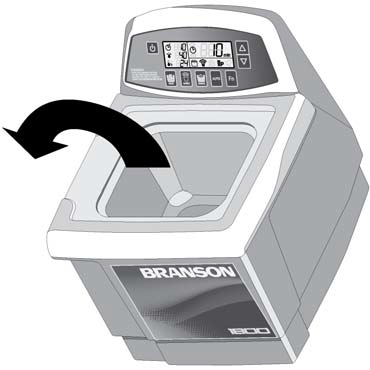 Smaller units will not have a drain. these are usually supplied with a channel on one side of the cleaner to facilitate pouring out your cleaning solution. Pour out your old solution, then rinse out your tank before adding new solution. Be sure to properly dispose of your cleaning solution.
Larger units will be equipped with a drain tube on the side or rear of the cleaner. Here's how to install and use it:
- Place the unit to allow easy reach of the drain tube into a waste disposal unit.
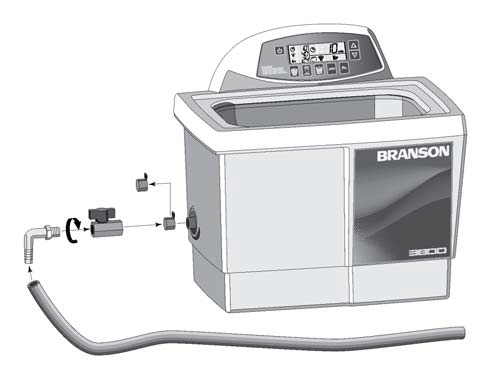
-
Remove the thread protecting cap from the end of the unit’s drain pipe. This will
expose the white teflon sealing tape on the drain pipe’s threads. -
Hand tighten the drain valve onto the drain pipe over the white teflon sealing
tape. Finish tightening the valve in place using an adjustable or a 21mm
wrench. Tighten the valve no more than one full turn when using the wrench
until the handle is on top.
CAUTION: Over tightening of the valve can cause damage to the ultrasonic
tank. Always use teflon sealing tape or a sealing paste designed for use with
stainless steel if retightening or refitting of the drain valve is required. -
Hand tighten the hose adaptor into the end of the drain valve. Slide the drain
tube over the barbed hose adaptor end. -
Close the drain valve by turning the handle perpendicular to the valve body and the unit is ready to fill with solution. To open the valve and drain the tank, turn the handle so that it is in line with the valve body. BACK TO TOP
What can I clean in my ultrasonic cleaner?
Ultrasonics will clean just about any organic soil from any hard surface. If you can scrub it off with a brush, you can most likely get it off with ultrasonics. Some common uses for ultrasonic cleaners include:
 Consistent repeatable results every time. Our ultrasonic baths thoroughly remove blood, protein, reagents, and other contaminants. Use your tank for cleaning: beakers, glassware
, lenses, instruments, and precision components.
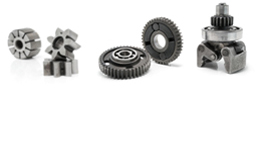 Powerful ultrasonics can support your industrial workflow. Get perfect, deep cleaning of blind holes and fine detail. Ultrasonic cleaning is perfect for removing: dirt, grease, waxes, and oils from light industrial parts and components of all kinds – including steel, light & nonferrous metals, plastic and glass.
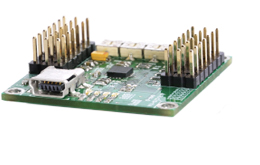 Safe precision cleaning for your delicate components. Completely remove flux and contaminants from: PC boards, SMDs, quartz crystals, capacitors, and many others. Especially good for clean up after repair and rework of iPhone, iPad, Tablet, and smartphone electronics.
 Safely and quickly remove support material from fused deposition modeling 3D-printed parts. Ultrasonic cleaning will speed up the removal of support material, reducing post-processing time and expediting the prototyping process.
 Ultrasonic cleaners are extremely versatile. They can also be used in laboratory applications for cell separation, cell lysing, mixing, emulsifying, sample preparation, and degassing of liquids.
Ultrasonic Application Whitepapers
Removing Biological Fluids From laboratory Glassware
Removing Oxidation, Oil, and Shop Dust From Copper Plumbing Fittings
Removing Polypropylene, Dust, Oil, and Dirt From Plastic Tool Models
Aqueous Degreasing of Metal Parts
Choosing the Right Cleaning Chemistry
Cleaning Ceramic Latex Molds
Cleaning Compact Disc Masters
Cleaning Printed Circuit Boards
Injection Mold Cleaning
Key Elements of Rinsing
Optical Lens Cleaning
Ultrasonic Cavitation and Precision Cleaning BACK TO TOP
Ultrasonic cleaners use sound waves to completely clean a firearm inside and out - within ten minutes. They're available in a variety of sizes to accommodate handguns and long guns. Systems consist of:
- Either a standalone benchtop ultrasonic cleaner, or a separate tank and power supply
- Mesh baskets for cleaning
- Solid trays or aux pans for lubrication
- Cleaning solution
- Lubricating solution
The process is as follows:
- The firearm is fieldstripped, then placed in a stainless steel mesh basket and lowered into the heated tank containing a cleaning solution.
- The machine produces high frequency sound waves that cause alternating high and and low pressure areas resulting in the creation of millions of tiny bubbles that implode on the gun, resulting in a scrubbing action that cleans down to the microscopic level.
- The gun is removed from the cleaning solution, rinsed with clean water and dried with compressed air.
- It's then placed into a separate basket and tank containing lubricant and set onto the ultrasonic machine where the firearm is thoroughly lubricated through cavitation.
- The gun is removed from the tank and then excess oil is then wiped and blown off the gun with compressed air.
- The firearm is reassembled and is ready for use or storage.
- The complete process, not including fieldstripping and reassembly, can be performed in less than 10 minutes.
The cleaning concentrate used, ChemCrest 235, is a mild alkaline-based cleaner with rust inhibitor. When mixed with water for use, it is nearly odorless. Guns are cleaned at approximately 125 degrees F.
Approximately 500 firearms can be cleaned with one gallon of CC235 cleaning concentrate, making it one of the most efficient cleaners available. The parts are lubricated with ChemCrest 400L lubricant, an odorless petroleum distillate that lubricates and protects firearms while removing moisture.
The cleaning procedure is safe for both blued and stainless steel firearms, along with night sights, polymer frames and rubber or plastic grips. Wood grips, electronic sights and scope should be removed from the guns before immersion.
On multiple firearm cleaning operations, use of the Crest Ultrasonics system increases actual output many times over hand cleaning, with tha parts restored to a uniform standard of factory-new cleanliness.
Finally, get in the habit of cleaning and visually inspecting any new firearm before its first use. Most are treated with oils to preserve their finish, which should be removed before firing. All of these good habits will add to safe practices and enjoyment of the shooting experience. BACK TO TOP

